Sunday, April 23, 2017
Easy Spring Roses -- Gel Nail Art
thfbjyhfjh
April 23, 2017
Freehand, Madam Glam, Nail Art, PressSample, Roses, Tutorial
Tutorial
Includes press samples
Even though the weather here in little Belgium seems to disagree, it's springtime! Which mean it's the perfect time for a simple pastel floral mani!
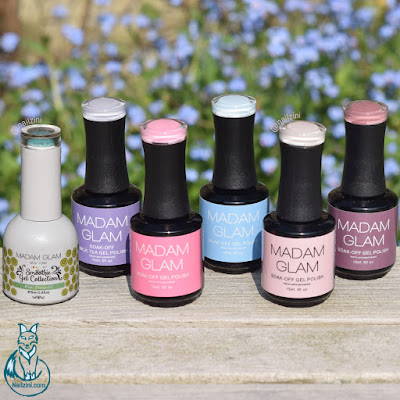
Madam glam recently contacted me to review some of their items and of course I was super excited. Their products are great and on top of that they are 5-free, vegan and cruelty free! They also gave me a 30% discount code "nailsqueen30%" to share with you guys in case you want to get some of their polishes.
I'm still waiting for my damaged middle finger nail to grow back on my left hand before doing the actual swatches (I'm not that skilled with my left hand 😅). But I couldn't wait that long before trying out these gorgeous polishes so I came up with this easy design that's doable with both hands. My right hand has never felt fancier!
All the polishes are absolutely stunning so I used all six of the polishes for this design, namely "Amor Azul", "Light Ruby", "Ballerina", "Angel Wings", "Cast a Spell", and "Kiwi Daiquiri". They make a perfect pastel spring combo!
I used 2 coats of "Amor Azul" or "Cast a Spell" as my base. It's easy to apply with their wide brushes, but you might need 3 coats if you apply it thinly. I'll have a more detailed review of every shade and the application when doing the actual review, because it's a bit hard to judge it well when using my left hand.
Then use a big dotting tool to dot 2-3 big dots of "Light Ruby" and "Angel Wings" on every nail. Don't cure this yet! While the dots are still wet use a detail brush or tiny dotting tool to add some swirls inside the dots using "ballerina". Place your brush in the middle and make a little spiral swirl, then make 2 to 3 half circles around it.
Lastly I used "kiwi daiquiri" from the smoothie gel collection for the leaves. This collection is a lot thicker than their other gels, so even though it's gorgeous I wouldn't recommend it for this because it makes it harder to paint tiny leaves. I don't have another green gel polish though so I'm using it anyway.
Using the detail brush or tiny dotting tool again place a small dot next to a flower, then drag it out a little to create a pointed shape. Add 1 or 2 leaves to all or some flowers and then cure it for 30 seconds.
**Disclaimer: These gel polish shades where given to me by Madam Glam for reviewing purposes, but all opinions are my own and not influenced by anything except my experience with these items.**
Subscribe to:
Post Comments (Atom)


0 comments:
Post a Comment